
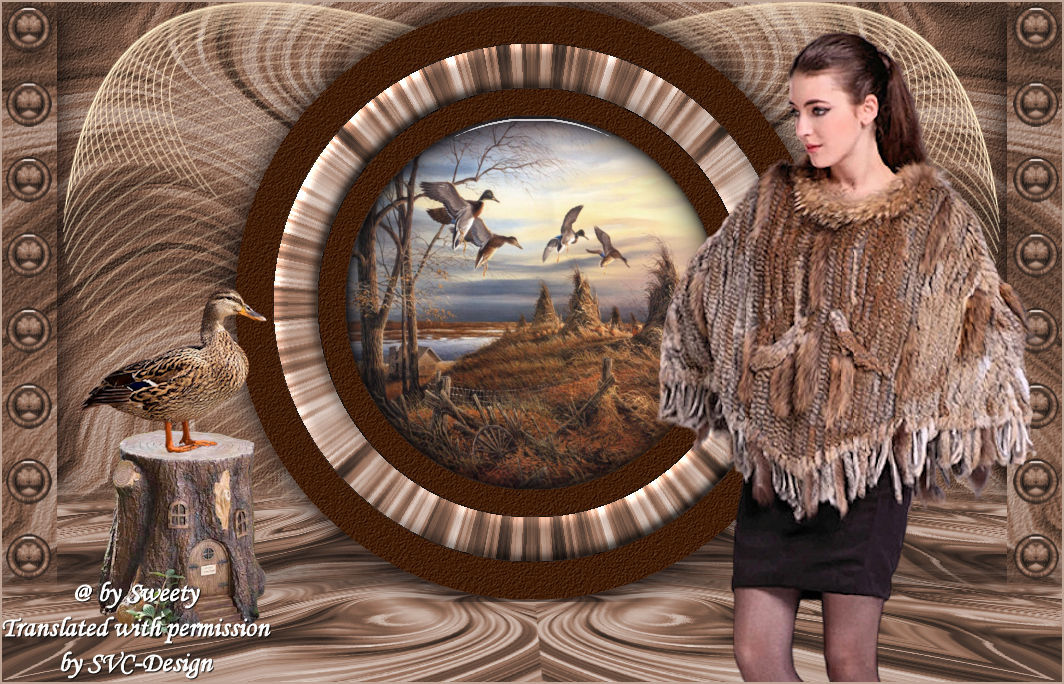
This lesson is made with PSPX9
But is good with other versions.
© by SvC-Design

Materialen Download :
Here
******************************************************************
Materials:
DECO PERSO 1 163 SEPTEMBRE 2021 SWEETY .png
DECO PERSO 2 163 SEPTEMBRE 2021 SWEETY .png
FOND 163.jpg
SELECTION 1 163 .PspSelection
SELECTION 2 163 .PspSelection
713hKPz-f3L._AC_SL1358_.jpg
AOUT 2021 BELLE DAUTOMNE SWEETY pspimage.png
AOUT 2021 CANARD COLVERT SWEETY.png
AOUT 2021 MAISONNETTE ARBRE SWEETY pspimage.png
******************************************************************
Plugin:
Plugin - Nik SoftWare==>Color Efex Pro 3.0 Complete
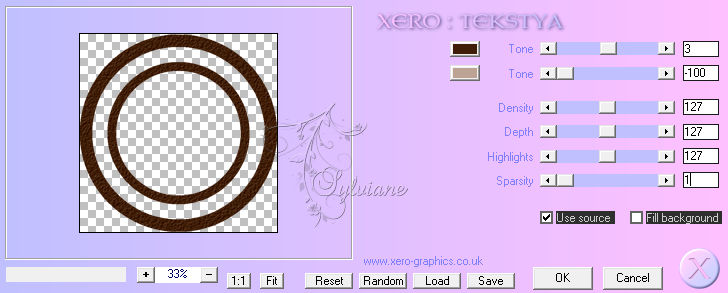
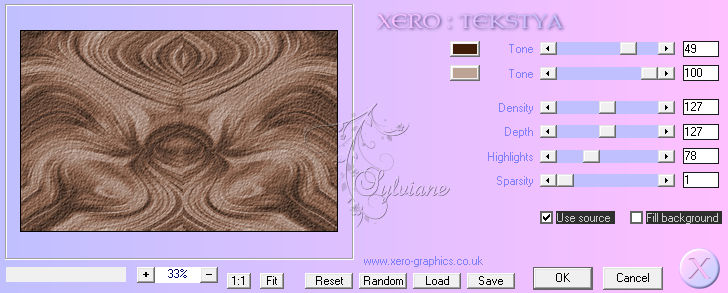
Plug-in – Xero - Tekstya:
Plugin - Alien Skin Eyes Candy 5 – Impact - Glass
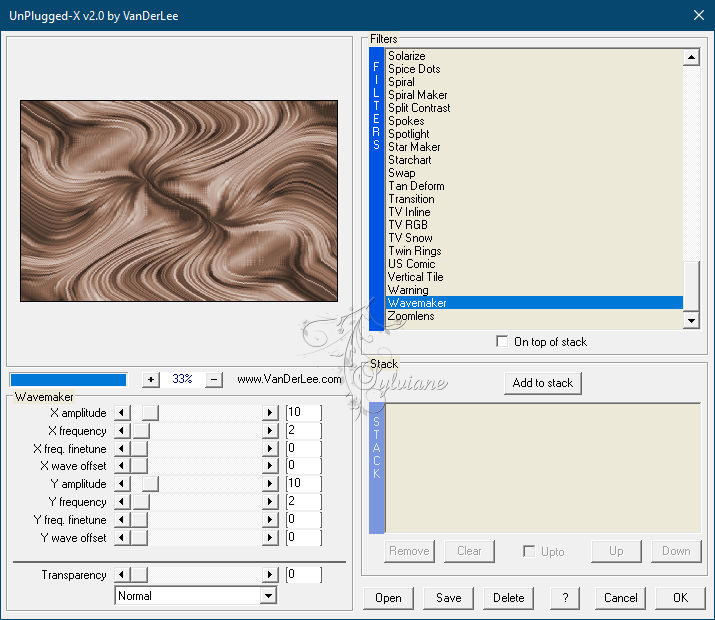
Plugin - VanDerLee Unplugged-X - Wavemaker
Plugin - MuRa's Filter meister - Perspective tiling
******************************************************************
color palette
:

******************************************************************
methode
When using other tubes and colors, the mixing mode and / or layer coverage may differ
******************************************************************
General Preparations:
First install your filters for your PSP!
Masks: Save to your mask folder in PSP, unless noted otherwise
Texture & Pattern: Save to your Texture Folder in PSP
Selections: Save to your folder Selections in PSP
Open your tubes in PSP
******************************************************************
We will start - Have fun!
Remember to save your work on a regular basis
******************************************************************
1.
Choose an image with autumn colors. Take 2 colors:
(Dark Foreground/ Light Background)
Open a transparent layer of 950/600.
Selection - Select All
Open 713hKPz-f3L._AC_SL1358_.jpg
Edit – Copy
Edit - Paste into selection
Selection - Select None
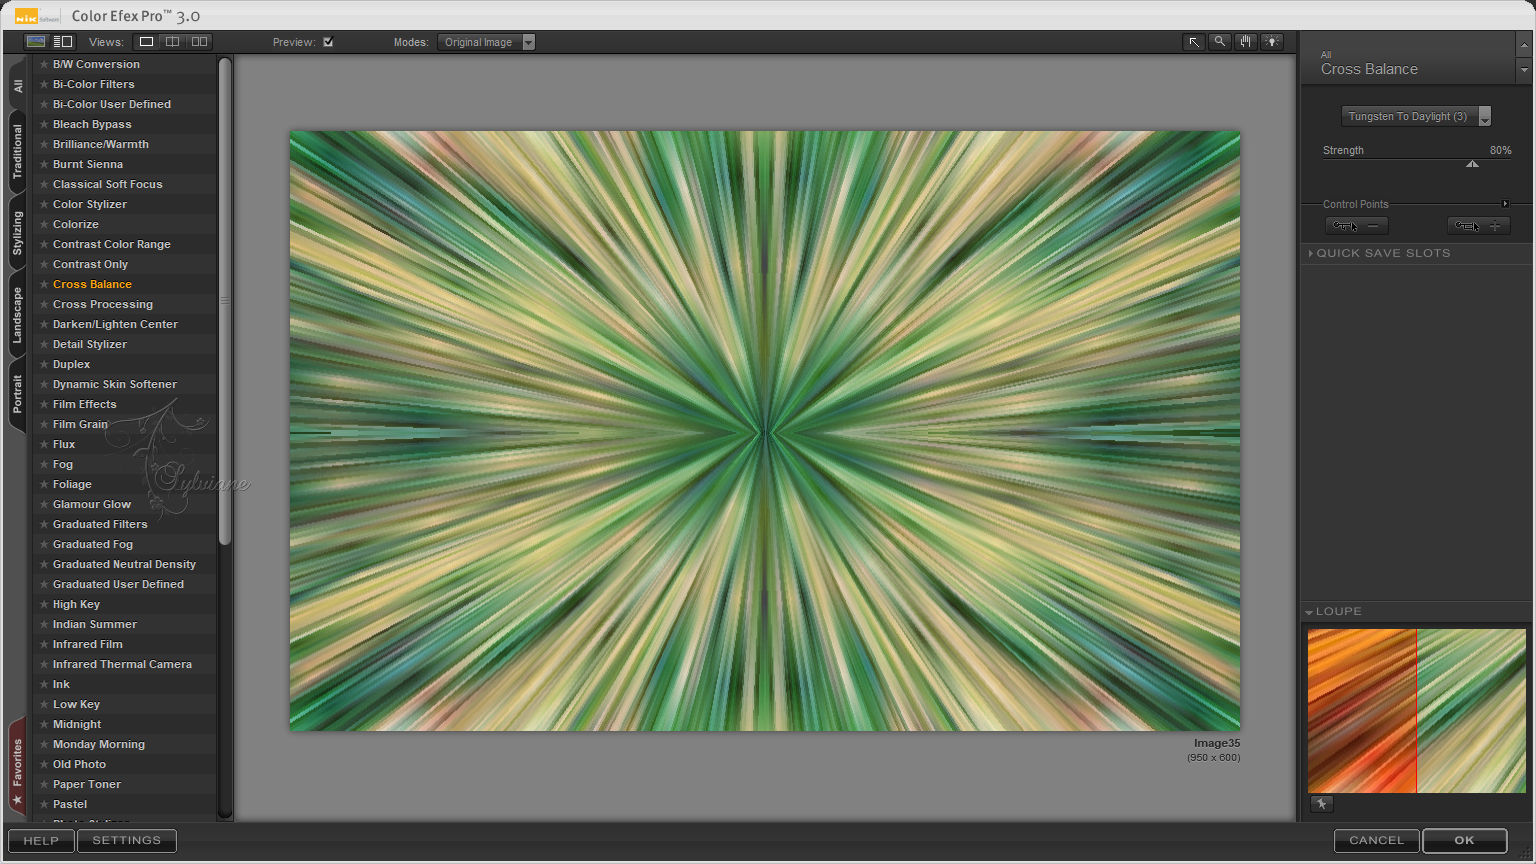
Plugin - Nik SoftWare==>Color Efex Pro 3.0 Complete:
Color by playing with the various proposals of this filter -
My screenshots are just examples of the many possibilities

options 2
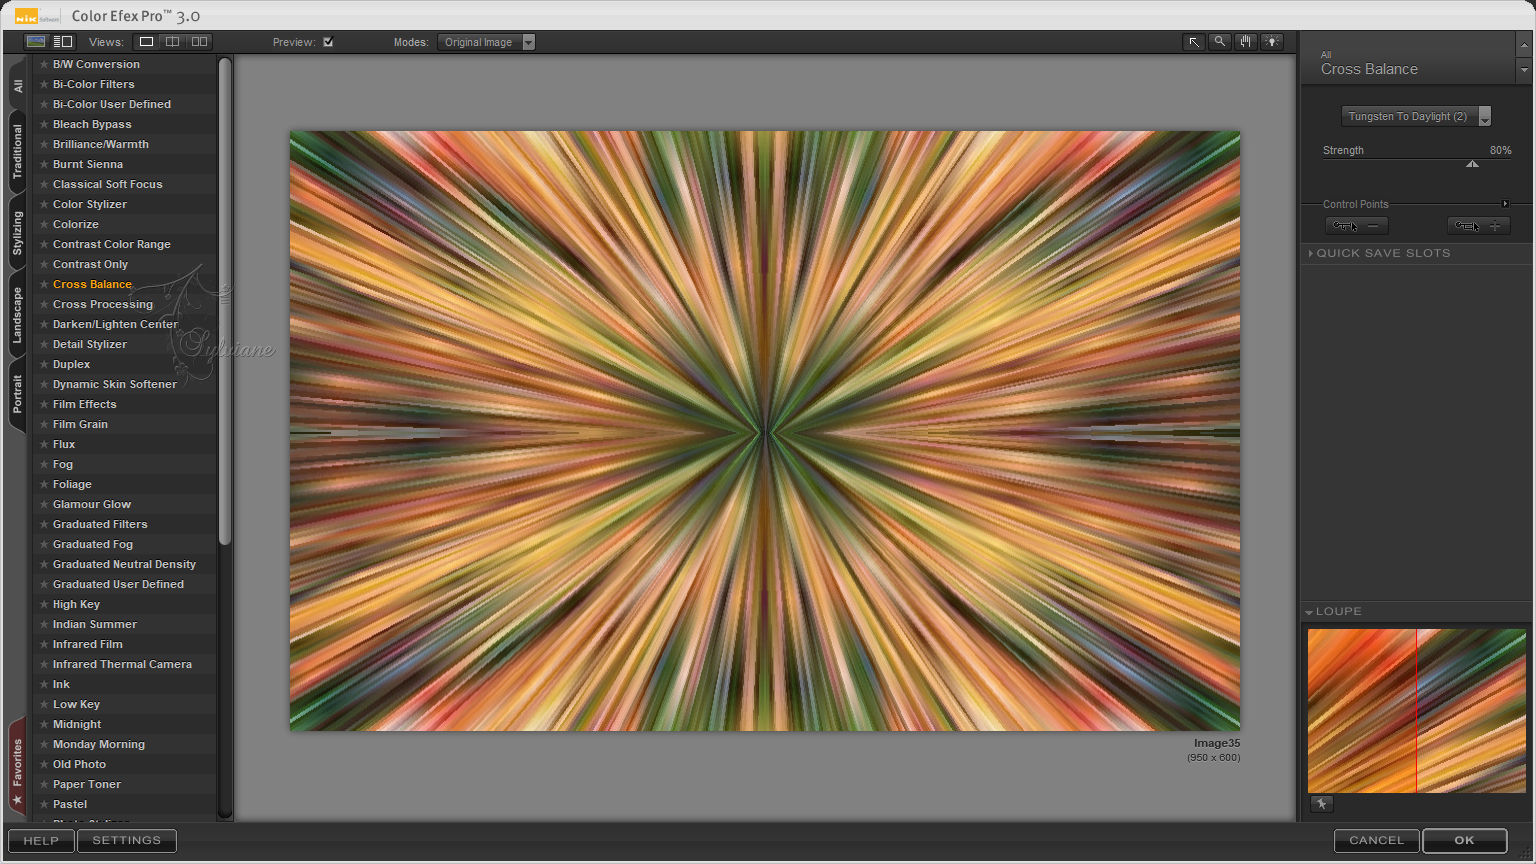
options 3
For my 3thversion I did differently: Once my background paste in the selection
Layer new layer. Paste the chosen image into the selection on which I did
default joinless tile. Arrange place at the bottom of the stack.
Return to top. Set this layer to * Luminance (H) *
and merge with the bottom layer
2.
Layers - New Raster Layer
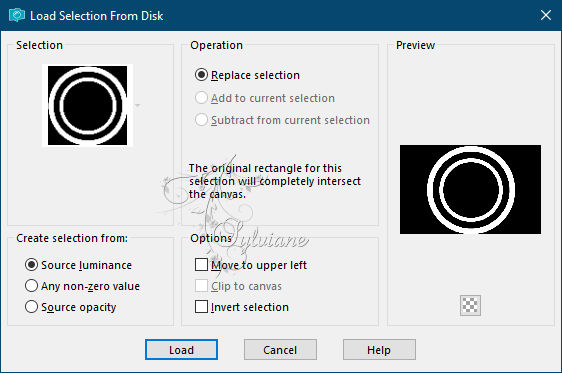
Selections - Load / Save - Load selection from disk - SELECTION 1 163 .PspSelection
Fill with #3f1d07
Plug-in – Xero - Tekstya
Selection - Select None
Close the eye of the bottom layer ...
With the magic wand tolerance and progressivity 0 click between the two circles:
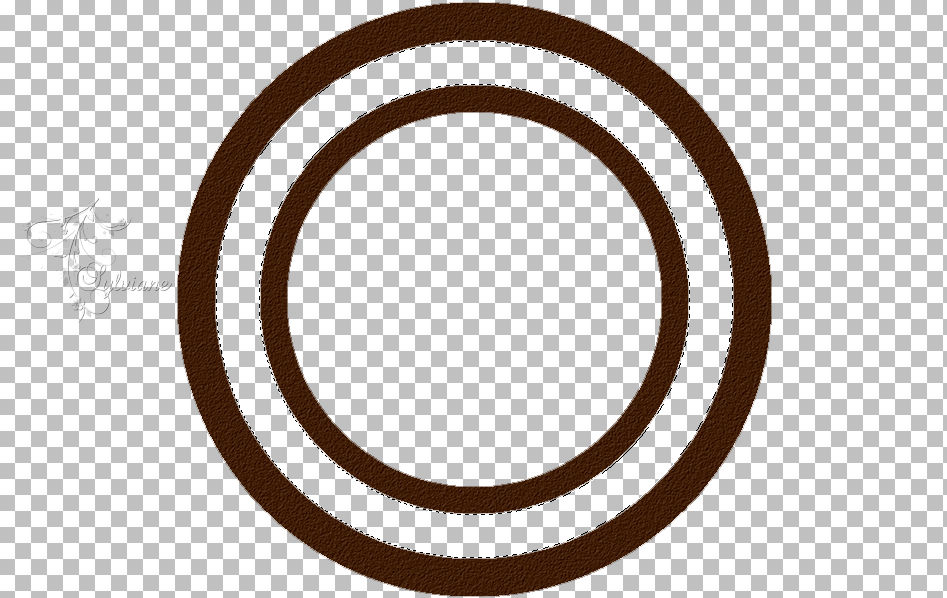
Place on the bottomlayer.
Open it and turn the selection into a layer
Selections – Promote selections to layer
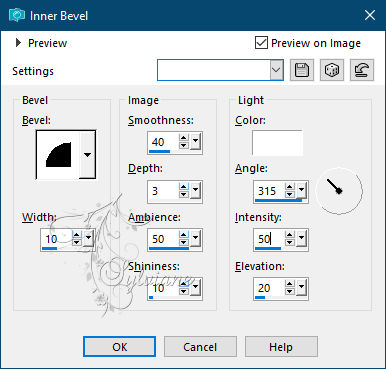
Effects – 3D effects – inner bevel
3.
Close the bottom layer again
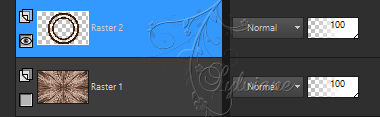
Go to the top of the stack (Raster 2)
With the magic wand tolerance and progressivity 0 click in the central circle:
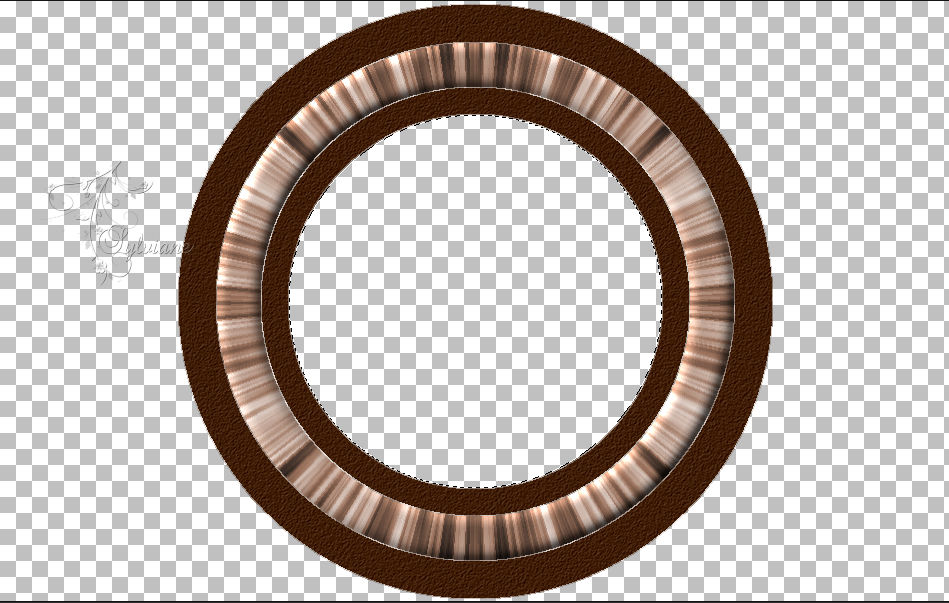
Place on the bottomlayer.
Open open the bottom layer
Selections – Promote selections to layer
Open 713hKPz-f3L._AC_SL1358_.jpg
Edit – Copy
Edit - Paste into selection
Selections - Invert
Effects - 3D effects - Drop shadow
0/0/100/50 color:#000000
Selections - Invert
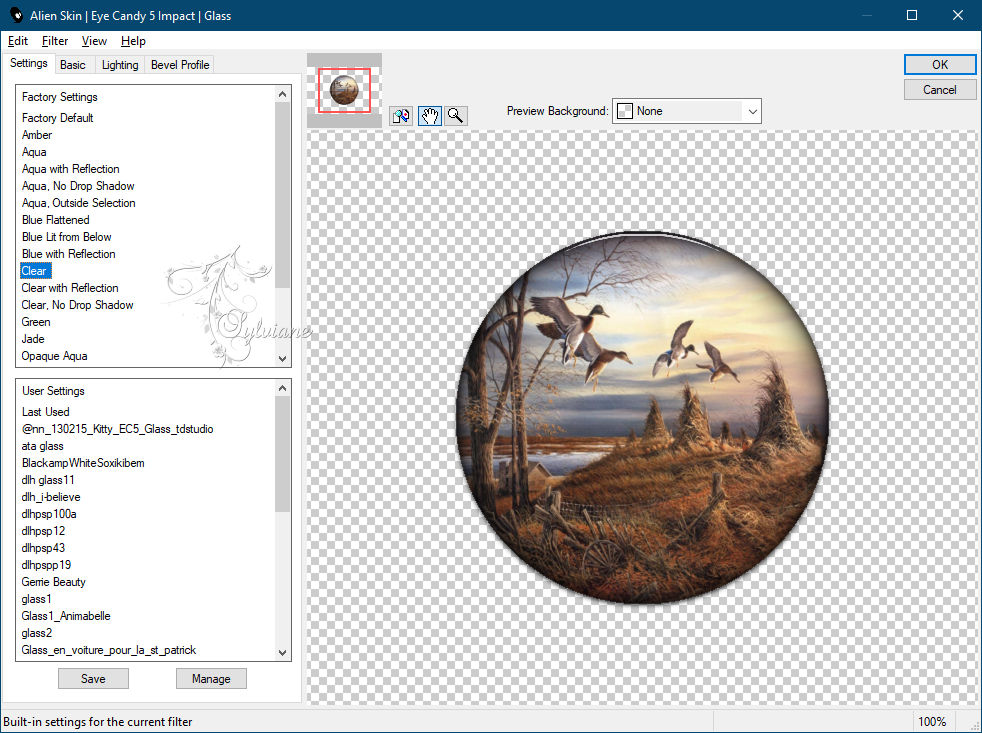
Plugin - Alien Skin Eyes Candy 5 – Impact - Glass
Selection - Select None
4.
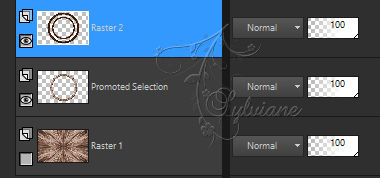
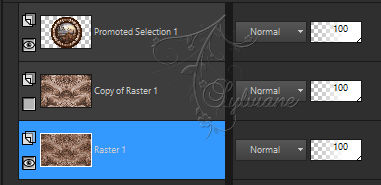
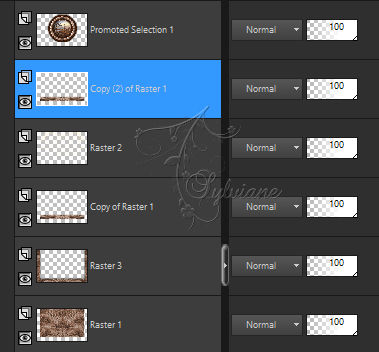
Our layers and tag are as follows:
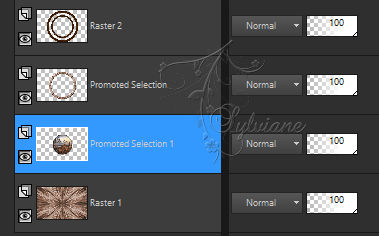
Activate Raster 2
Layers – merge – merge down (2x)
Activate raster 1
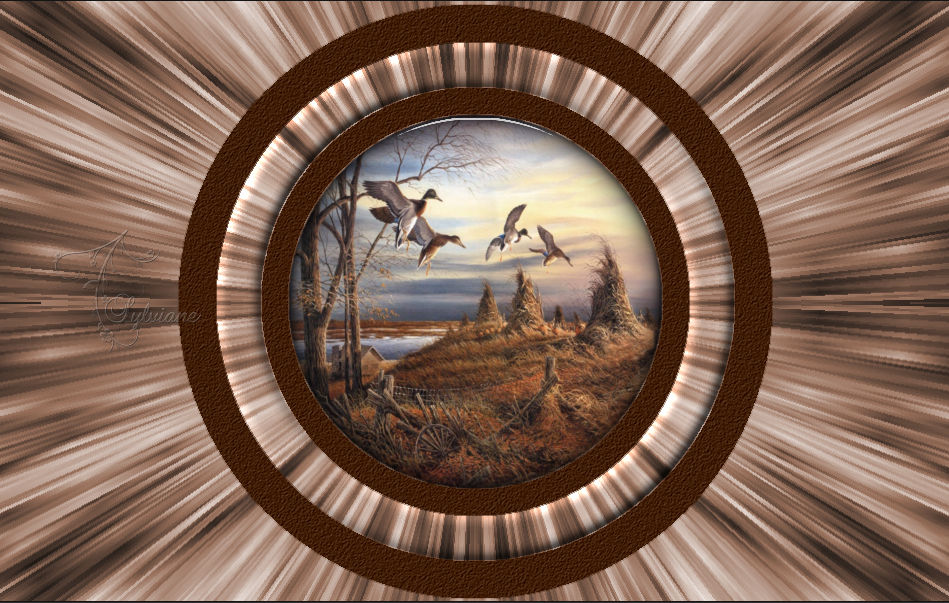
Plugin - VanDerLee Unplugged-X - Wavemaker
5.
activate Selection - Custom selection

Erase or delete on the keyboard.
Selection - Select None
Layers - Duplicate
Image - Mirror – mirror Horizontal
Layers – merge – merge down
Layers – Duplicate
Close Copy of Raster 1
Activate raster 1
6.
Plug-in - Xero - Tekstya:
Layers - Duplicate
Blendmode: Lighten
Opacity between 25 and 30% -
Layers – merge – merge down
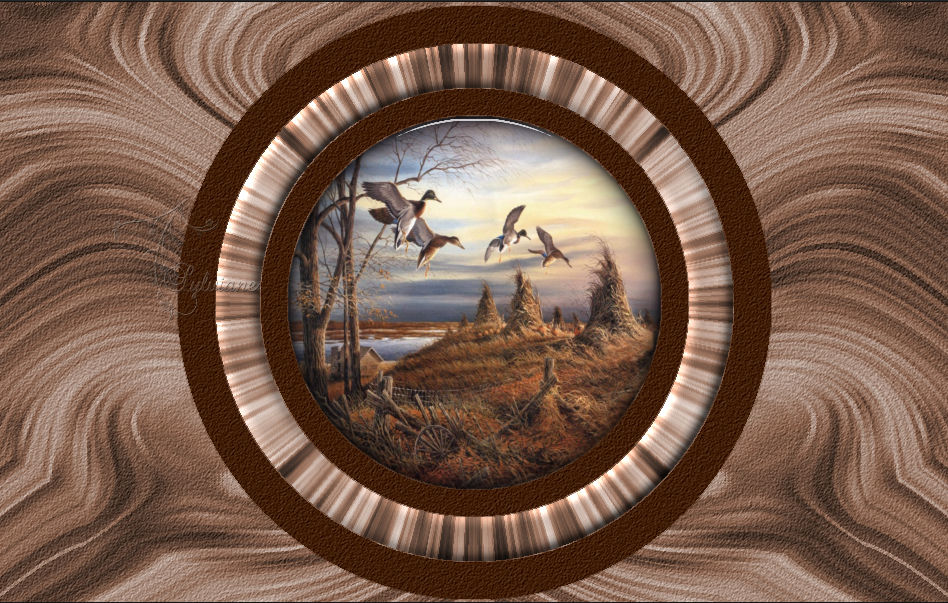
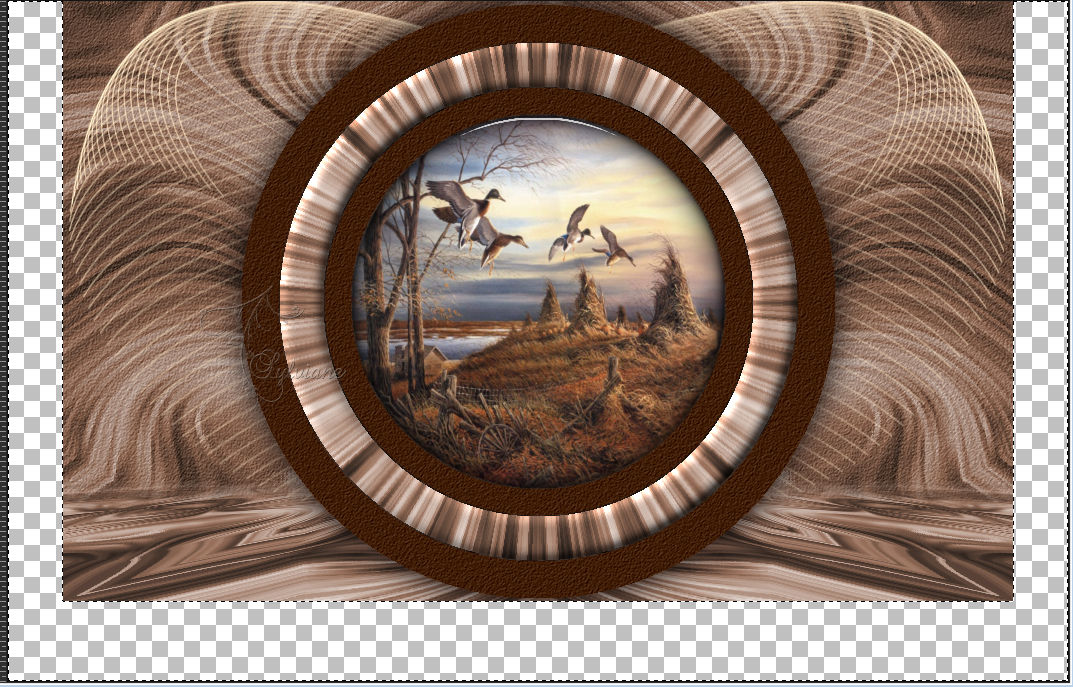
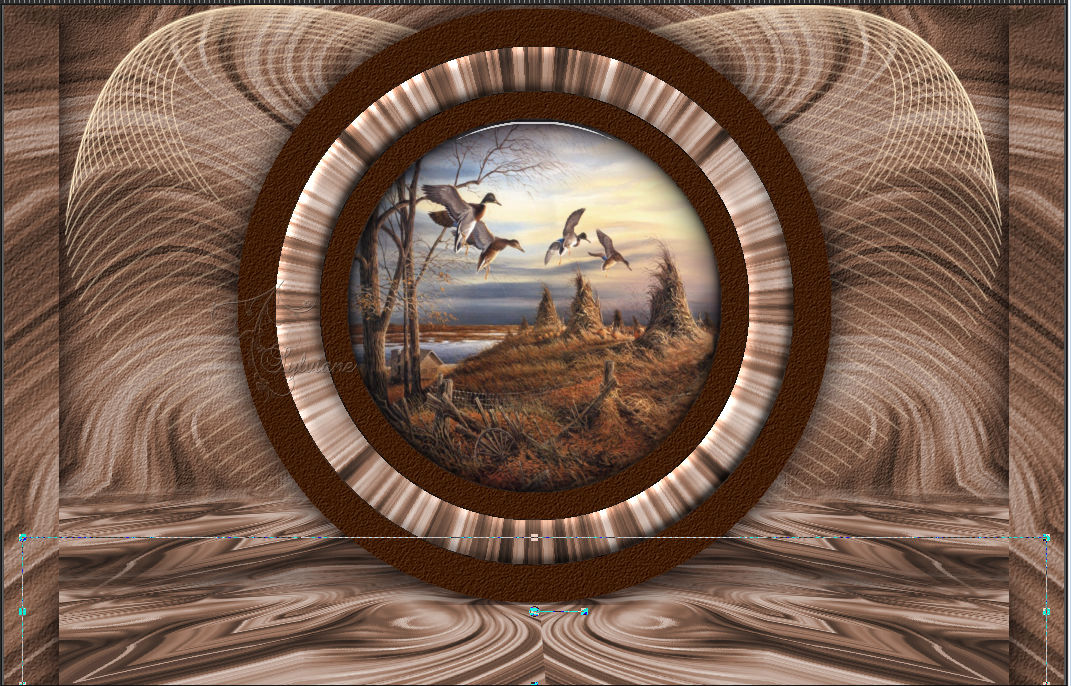
Here we are:
7.
Activate Copy of Raster 1
Now open the eye of this layer
Plugin - MuRa's Filter meister - Perspective tiling

Selections - Load / Save - Load selection from disk - SELECTION 2 163 .PspSelection

Erase or delete on the keyboard about three times.
Selection - Select None
8.
Open DECO PERSO 1 163 SEPTEMBRE 2021 SWEETY .png
Edit – Copy
Edit - Paste as new layer
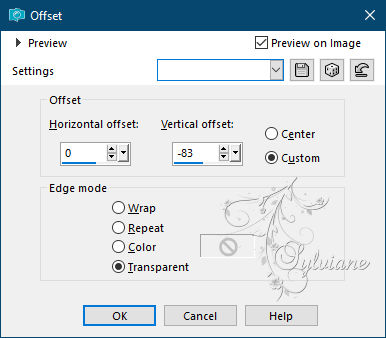
Effects - Image Effects – Offset
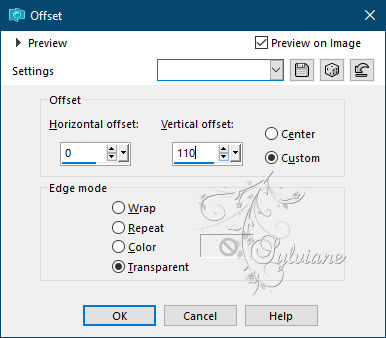
Selector tool enabled (K on the keyboard) adjust as on my capture:
Activate Promoted Selection 1
Effects - 3D effects - Drop shadow
0/0/100/50 color:#000000
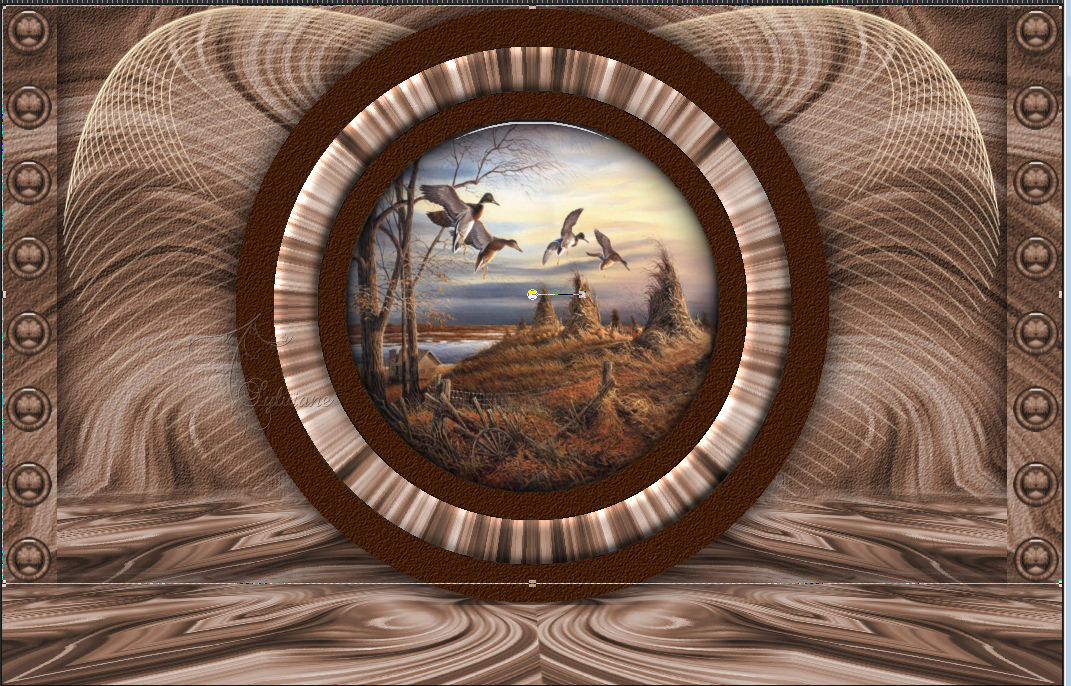
9.
Activate raster 1
Copy(image goes into memory)-
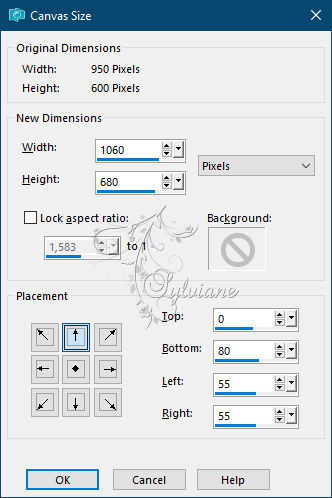
Image - media size
With the magic wand tolerance and progressivity 0 click in the transparent part:
Layers - New Raster Layer
Paste in the selection the image that is in memory -
Effects - 3D effects - Drop shadow
0/0/100/50 color:#000000
Selection - Select None
10.
On the layer just above (the floor Copy of Raster 1). Duplicate layer -
Layers - arrange – up

Effects - Image Effects - Offset
with the selector tool stretch left and right to the edge

Effects - 3D effects - Drop shadow
0/0/100/50 color:#000000
11.
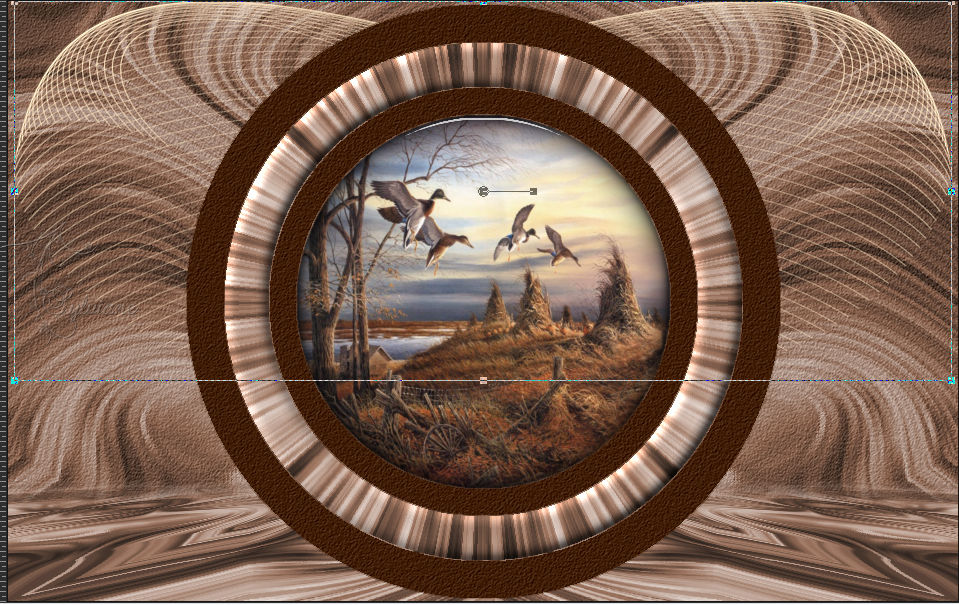
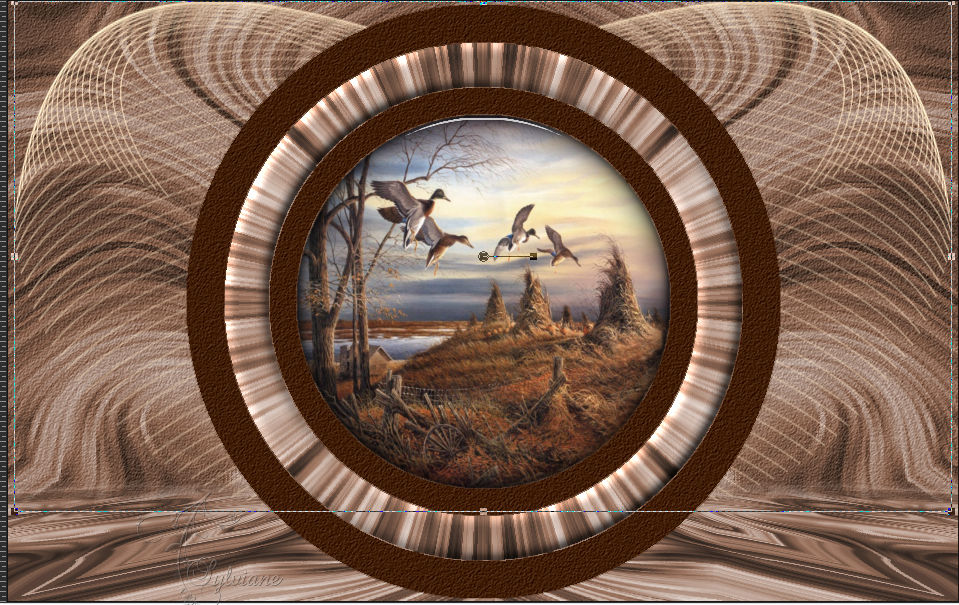
At the top of the pile stick as a new layer the personal decoration 2 163
Place as on my model:
Using the filter: Nik SoftWare Colr Efex Pro 3.0 Complete:
Color by playing with the various proposals of this filter -
(As for step 1) or * Luminance ( H) *
12.
Open AOUT 2021 BELLE DAUTOMNE SWEETY pspimage.png
Edit – Copy
Edit - Paste as new layer
if necessary - resize image
place as in the example
Open AOUT 2021 MAISONNETTE ARBRE SWEETY pspimage.png
Edit – Copy
Edit - Paste as new layer
resize image: 40%
place as in the example
Open AOUT 2021 CANARD COLVERT SWEETY.png
Edit – Copy
Edit - Paste as new layer
resize image: 50%
place as in the example
13.
Image - Add Borders – 2 pixels – color:#bda394
Sign and affix my watermark if you wish
Layer – merge – merge all (flatten)
Resize to 950 pixels
Save as JPEG
Back
Copyright Translation © 2021 by SvC-Design